Vaya más rápido en la dirección correcta.
Choose your language
The new optimised Alternative boat build
When I play golf, if I drive off the tee and lose my ball because of an errant swing, why is it that my second attempt is nearly always perfect making me wonder why didn't I swing like that on my first shot!
It's kind of like that when you build a second boat. The first attempt is full of small errors, air bubbles, lifted glass at the bow and stern, too much epoxy used, etc. The second boat has errors but it is much better and lighter.
I started the second boat yesterday afternoon and unwrapped it this morning and what a beauty she looks. If you are interested, here is what I did with a few pictures.
I started by repairing the old hull plug, patching up some damage when I cut the previous boat off the plug with a dremel. After a rub down and 5 coats of release wax it was good as new and ready for the layup.
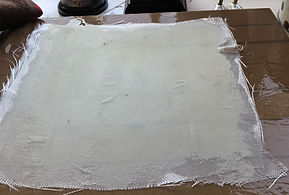
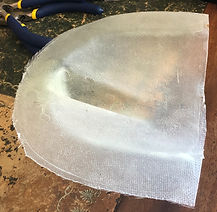
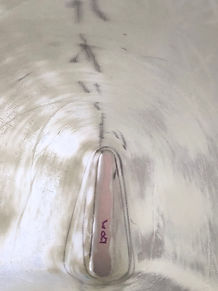
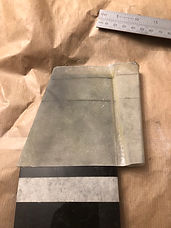
I cut out 3 sheets of 124gm S glass from a paper pattern I made earlier. I acquired 3 sheets of brown paper which were from a delivery of an old flower arrangement (my wife's!). With care, I cut the glass cloth straight onto the brown paper from the paper pattern I made earlier. The cloth was cut with no mess. In addition to the cutting, I drew a centre line with a felt pen and perpendicular lines (to the centreline) for the bow, stern and edge of the foredeck. This is done to allow easy alignment (when laying down the cloth onto the plug) with a centreline drawn down the keel of the hull along with a mark to indicate the foredeck. The brown paper not only seperated the 3 layers of cloth but also allows the cloth to be rolled up and carried as well as protecting the edges, keeping the cloth flat and clean. (Image 1)

Last summer on the first boat build, I cut the glass outside on a table, did not use any paper or protective cover and ended up with strands of glass fibre all over the patio!
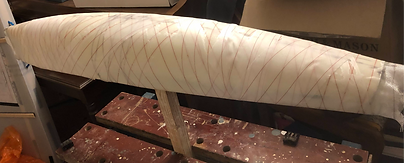
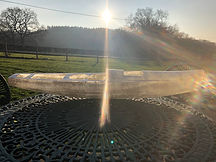
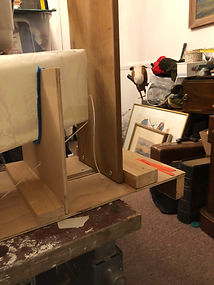
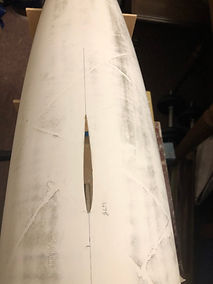
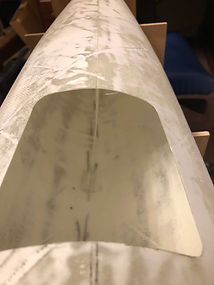
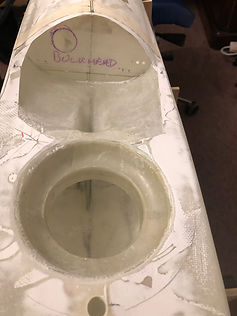
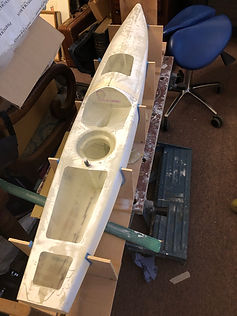
With the cloth prepared, I was ready to lay the hull up in the garden shed. Yesterday it was about 12 degrees which is just warm enough to work with epoxy. I needed a workbench to clamp the hull upside down (Image 4), a piece of wood hanging from the shed ceiling to screw the plug support post to work on the deck (Image 3), paper towel to wipe up mess, acetone for cleaning, nitril gloves to protect my hands, West System epoxy (slow cure), three plastic pots (I use fromage frais pots), a 2 inch paint brush and an aluminium roller for removing air bubbles, peel ply for wrapping the epoxy, screwdriver and electric drill for mounting and dismounting the plug. With all the bits together on site, I was ready to go. After mixing the epoxy using the self measuring plungers that you screw on the resin and hardener tins (3 pushes of the plunger will do one layer of glass) I applied resin to the hull side of the plug, being careful to wet the curves of the deck. The epoxy will not lie smooth on the wax and will pull back into globules looking a bit messy but it won't matter. Taking the first layer of cloth and with the boat mounted upside down on the workbench, hold it over the hull aligning the centreline, bow, stern and foredeck marks before laying the cloth down on the epoxied plug. (Image 2 3 and 4)


Gently smooth out the cloth with the paint brush and work out from the centre until the cloth is flat all over. This is quite fiddly but by taking time and being patient the cloth will lay out perfectly. Next step is to go over the cloth with the paint brush (be very gentle) and wetting the cloth where dry, removing air bubbles as you go. Use the epoxy sparingly as excess resin just adds weight. Finally go over the hull with the aluminium roller to get any missed air bubbles.
Now remove the plug from the workbench and screw to the bar dropping from the shed ceiling. Initially fix the hull upside down and then carefully allow the plug to rotate down while supporting the cloth over the deck, until the deck is level. (In my first build last summer, I picked the plug from the workbench after wetting the cloth on the hull, rotated it so the deck was uppermost, raised it up to the supporting bar and the glass cloth fell off onto the floor. You have been warned!)
Before you work the cloth into the deck with the paintbrush, cut away any excess. On the first layer I used a 1 inch overlap. On the second layer, I butt the ends of the cloth (ie no overlap) and on the third layer use an overlap again. In this way you avoid too much weight along the centreline of the deck. On my first boat I ended up with 6 layers of cloth on the centreline which produced a strong boat but heavy in the ends.
Work the cloth into the deck with the paint brush in the same way as the hull, until flat and smooth. Sorry there are no pictures of this as my gloves were coated in epoxy at the time!
Check over the hull and deck in good light to make sure there are no air bubbles and the cloth is tightly bonded at the bow and stern.
Leave the plug until the epoxy remaining in your mixing jug starts to go stringy. When this happens, the first layer of cloth will be stuck nicely to the plug and won't move when you apply the second layer. The longer you can leave it between layers the better. Half an hour should be long enough.
Wash your paint brush, gloves and roller in acetone and mix the second batch of epoxy. Bin the 1st mixing pot.
For the second layer, drape the cloth over the hull taking care with the alignment marks and brush out as before using just enough epoxy to wet the cloth.
Repeat for the third layer remembering to clean tools in between. I use four plunges of epoxy for the last layer because I wanted the outer layer slightly wetter. Any excess would be absorbed by the peel ply.
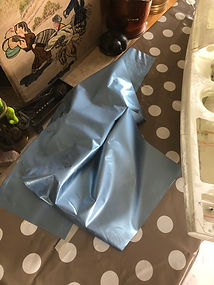
Finally wrap in peel ply. I used 10 metres of 100mm wide. Overkill I know but it did an amazing job even though the hull look a bit mummy like. (Image 5)
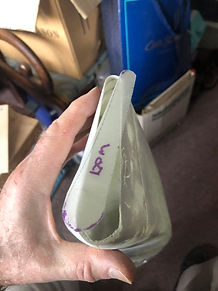
At the same time as laying up the hull, I made the components in Image 8. 9. 10. 14, 15 and 18. The fin box was Dave Creed's work.
A thin sheet for the bow stern and bulkheads
The mould for the deck layout above the fin box and final deck

Strip of S glass for bonding the deck

Reinforcement for the fordeck understanding the jib tack eyes

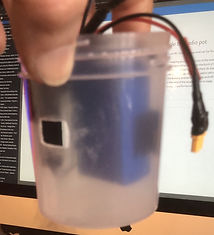
The radio pot and forward bulkhead

Paper template for forward bulkhead

I peeled the peel ply off this morning to discover a hull with no air bubbles, perfect adhesion at the bow, stern and foredeck.
In all the process took about 3 hours
All I need now are two coats of epoxy primer rubbed smooth and I am ready to pop the hull off the plug. Here is the rough finish prior to sanding
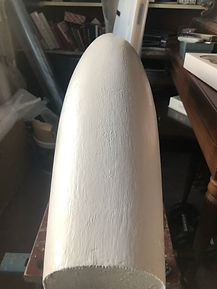
The finished hull popped off the mould safely in its supporting jig with the deck taped together to hold it secure

It all looks good and I know that the hull is useable so I can pay the second design fee and fit the boat out.
Having added two coats of epoxy primer, it is time to rub it all back to the surface of the S glass to make the hull as light and as smooth as possible. Up to two hours sanding. Joy! but the end result is worth the effort.
After painting on 250gms of High build epoxy primer, I sanded 200gms off on Saturday. The result is a very light smooth hull which you can see through.
The hull will remain in this condition until the deck has been finished and all the holes drilled. Then it is time for the vinyl wrap in metallic blue. Can't wait to see how it ends up when cut off the mould.
Once the hull is off the mould it goes straight into a support jig, with the frames cut from the design plan. This jig is marked and used for setting the fin position and rudder. (Image 7)
The foredeck and aft deck is bonded using 1 layer of 124gm s cloth (Image 13). The hull is strong and ready for the fin box, bulkhead and adjoining deck and radio pot to be bonded in.
On Sunday I cut all the access holes, (Image 33) and added two further layers of S glass around the fin box area in the hull, bonded the deck with an extra layer of S glass at the jib take off point and fitted the transom
I put small reinforcing plates in the deck at the stern and put 1 layer of S glass about 1 inch wide down the centre of the foredeck.
All up weight of the hull with all glass infrastructure but ex fitting will be around 400gms, considerably lighter than my first hull especially in the ends but heavier than the professional hulls. Having said that the hull is very strong, light in the ends and should be competitive.
Todays job is to fit the fin, bulkhead, deck moulding and radio pot and a post for the jib tack take off point. On course to finished hull by end of week.
A long day sealing the bow and stern, (Image 18 and 19) strengthening the foredeck, building an ultra light foredeck post (Image 14), cutting a slot in the hull (Image 21), measuring and shaping the forward bulkhead (Image 15 and 16) , fin case and deck. Lots of pictures below in a slightly random order.


Tomorrow I hope to bond in all the pieces and then the only other major jobs are to fit the plates for the servo and rudder stock which will likely be done on Wednesday. Then a final rub down and drill all the holes for the deck fittings. Finally after that I can wrap the boat in its metallic blue vinyl. Its an experiment but I am sure it will be worth the effort and if it doesn't work I can always paint it.
Fitting the fin
Yesterday was all about getting the fin box fitted. Alignment of the fin in exactly the right position with the design measurements and having it vertical is the most critical job on the boat. Get this wrong and the boat will be hard to balance and may sail higher on one tack that the other.
The boat in my jig is set up to be level on its water line, ie there is a horizontal line connection the bottom of the bow and bottom of the stern. The leading edge of the fin sits perpendicular to this line. Get the jig right and everything is easy. On the plan there are two measurements, one from the hull to the leading edge of the fin and then one from the tip of the bow to the bottom of the fin where it enters the bulb. Set these measurements and the fin leading edge should be perpendicular tp the waterline of the boat. I was less than a degree out. See image 24-27.
To get the fin exactly vertical looking from the stern, I level the boat at the shroud point and use a level on the fin to make vertical and then use masking tape to secure it. Gravity helps in picture 27.
The string in the picture is used to measure from the bow to the fin but I did have to make holes in the jig.
Tomorrow, I can fit the final pieces of the deck and the bulkhead.


Finishing the bonding
Yesterday was gluing day. Fitted the forward deck, pre drilled bulkhead, radio pot holder and mainsheet post.
Only one small error. I forgot to seal and reinforce the top of the fin box
I have the fiddliest job to do that today plus final fit for the servo mount and rudder stock mount. Nest jobs are to pre drill all the fitting holes, apply filler where required and final sand ready to apply wrap.
When fitting the mainsheet post, I accurately measured a centreline at the deck and then did the same with a string 6 inches off the deck. Then using a set square I was able to get the mainsheet post upright and aligned with the fin case, back stay, jib sheet eyes and jib attachment points which are all marked up. Fingers crossed the sails will set the same on both tacks.
Hull weight so far is 420gms. Old hull weight at this point 620gms. Maybe 350gms is achievable with a slightly thinner layup. I was generous with the epoxy at the base of the fin but this is where the correctors with be anyway. Estimate approx 400gms of correctors will be required.
Tidying up
Final bit of reinforcement went in yesterday. Not much to show as boat looks similar to day before but with addition of rudder stock and servo supports. Giving the hull a good t cut to look for any rough spots and then the metallic blue wrap
Little remaining jobs to do after the wrap like final fit of fin and add the electronics and fittings


Finished the build
With the final jobs knocked off on Friday the hull is ready for wrapping. I spent today sanding and cleaning the hull and deck, final fit of the fin and rudder which ended up exactly according to the design plans and are both in line with each other. Tomorrow will be wrapping day.
Ordered the new PG tubes from Potters Solutions and a couple of bits and bobs from Sailsetc. Once the boat is wrapped I can set up the new rigs using existing fittings apart from the shrouds. Then a bit of in house tuning and I am ready to get on the water.
Its not a wrap
The wrap failed. There is so much curvature in the hull and deck, you need to stretch the wrap so much before application and you need several pairs of hands, so it's back to the paint spraying.
The boat is finished bar the spray and as Mr Gibson said you are far better off with paint as damaged vinyl is impossible to repair. He should know he used to wrap 18 footers amongst other things. Why didn't I speak to him first.
The dream was there, the experience was missing. Loved the metallic finish but it is not to be.
Onwards and upwards and off to watch the 18 footers race round Sydney harbour in the JJ Giltinan. On the computer of course
Decision time on paint
It has been a long process trying to sort the paint for the boat. I could use my tried and tested 2 pack polyurethane which I know is hard durable and the right solution, but I do want to spray to keep the decks looking smart. As you know I tried using vinyl wrap but the curves of the boat proved too much.
The search took me to spray cans of epoxy, enamel and other finishes but I came across an industrial acrylic based paint in a spray can. It is designed for repair of industrial coatings indoor or external. Its a risk I know but I prepared a sample this afternoon and it has great colour, is hard, flexible, great UV properties and resistant to scratches. The date sheet is here:
http://www.farnell.com/datasheets/3165638.pdf
So on it goes tomorrow and we will see how the paint performs. The pictures below show the new spray look on a sample and the effect I am trying to avoid when painting 2 pack Polyurethane. I will show you the result tomorrow and then see how it wears when we get sailing.
La nueva construcción alternativa optimizada del barco
Cuando juego golf, si salgo del tee y pierdo la bola debido a un swing errante, ¿por qué mi segundo intento siempre es perfecto y me pregunto por qué no lo hice así en mi primer golpe?
Es algo así cuando construyes un segundo barco. El primer intento está lleno de pequeños errores, burbujas de aire, cristales levantados en proa y popa, demasiado epoxi usado, etc.
Arranqué el segundo barco ayer por la tarde y lo desenvolví esta mañana y qué belleza se ve. Si está interesado, esto es lo que hice con algunas fotos.
Comencé reparando el viejo tapón del casco, reparando algunos daños cuando corté el tapón del barco anterior con una dremel. Después de un masaje y 5 capas de cera de liberación, quedó como nuevo y listo para la colocación.
Corté 3 hojas de vidrio S de 124 g de un patrón de papel que hice antes. Adquirí 3 hojas de papel marrón que eran de la entrega de un arreglo floral antiguo (¡de mi esposa!). Con cuidado, corté la tela de vidrio directamente sobre el papel marrón del patrón de papel que hice antes. La tela se cortó sin ensuciar. Además del corte, dibujé una línea central con un rotulador y líneas perpendiculares (a la línea central) para la proa, la popa y el borde de la cubierta de proa. Esto se hace para permitir una alineación fácil (al colocar la tela sobre el tapón) con una línea central dibujada en la quilla del casco junto con una marca para indicar la cubierta de proa. El papel marrón no solo separa las 3 capas de tela, sino que también permite enrollar y transportar la tela, además de proteger los bordes, manteniendo la tela plana y limpia. (Imagen 1)
El verano pasado, en la primera construcción del barco, corté el vidrio afuera en una mesa, no usé papel ni cubierta protectora y terminé con hebras de fibra de vidrio por todo el patio.
Con la tela preparada, estaba listo para colocar el casco en el cobertizo del jardín. Ayer fue alrededor de 12 grados que es lo suficientemente caliente para trabajar con epoxi. Necesitaba un banco de trabajo para sujetar el casco al revés (Imagen 4), un trozo de madera colgando del techo del cobertizo para atornillar el poste de soporte del tapón para trabajar en la cubierta (Imagen 3), toalla de papel para limpiar el desorden, acetona para limpiar , guantes de nitrilo para proteger mis manos, epoxi West System (curado lento), tres botes de plástico (yo uso botes de fromage frais), una brocha de pintura de 2 pulgadas y un rodillo de aluminio para eliminar las burbujas de aire, una capa protectora para envolver el epoxi, un destornillador y Taladro eléctrico para montar y desmontar el enchufe.
Con todas las partes juntas en el sitio, estaba listo para comenzar. Después de mezclar el epoxi con los émbolos de medición automática que atornilla en las latas de resina y endurecedor (3 empujes del émbolo harán una capa de vidrio), apliqué resina al lado del casco del tapón, teniendo cuidado de mojar las curvas del plataforma. El epoxi no quedará liso sobre la cera y se volverá a formar glóbulos con un aspecto un poco desordenado, pero no importará. Tomando la primera capa de tela y con la embarcación montada boca abajo sobre el banco de trabajo, sosténgala sobre el casco alineando las marcas de línea central, proa, popa y cubierta de proa antes de colocar la tela sobre el tapón epoxi. (Imagen 2 3 y 4)
Suavemente alise el paño con el pincel y trabaje desde el centro hasta que el paño quede completamente plano. Esto es bastante complicado, pero si se toma tiempo y se tiene paciencia, la tela se extenderá perfectamente. El siguiente paso es repasar el paño con el pincel (sea muy suave) y humedecer el paño donde se seque, eliminando las burbujas de aire a medida que avanza. Use el epoxi con moderación ya que el exceso de resina solo agrega peso. Finalmente, revise el casco con el rodillo de aluminio para eliminar las burbujas de aire.
Ahora retire el tapón del banco de trabajo y atornille a la barra que cae del techo del cobertizo. Inicialmente, fije el casco al revés y luego permita que el tapón gire hacia abajo con cuidado mientras sostiene la tela sobre la cubierta, hasta que la cubierta esté nivelada. (En mi primera construcción el verano pasado, tomé el tapón del banco de trabajo después de mojar la tela en el casco, lo giré para que la cubierta quedara hacia arriba, lo levanté hasta la barra de soporte y la tela de vidrio cayó al piso. sido advertido!)
Antes de introducir la tela en la plataforma con el pincel, corte cualquier exceso. En la primera capa utilicé una superposición de 1 pulgada. En la segunda capa, coloco a tope los extremos de la tela (es decir, sin superposición) y en la tercera capa uso una superposición nuevamente. De esta forma evitará demasiado peso a lo largo de la línea central de la plataforma. En mi primer bote terminé con 6 capas de tela en la línea central, lo que produjo un bote fuerte pero pesado en los extremos.
Trabaje la tela en la cubierta con la brocha de la misma manera que el casco, hasta que quede plana y lisa. ¡Lo siento, no hay fotos de esto ya que mis guantes estaban cubiertos de epoxi en ese momento!
Revise el casco y la cubierta con buena luz para asegurarse de que no haya burbujas de aire y que la tela esté bien adherida en la proa y la popa.
Deje el tapón hasta que el epoxi restante en su jarra de mezcla comience a ponerse fibroso. Cuando esto suceda, la primera capa de tela quedará bien pegada al tapón y no se moverá cuando aplique la segunda capa. Cuanto más tiempo puedas dejarlo entre capas, mejor. Media hora debería ser suficiente.
Lave su brocha, guantes y rodillo en acetona y mezcle el segundo lote de epoxi. Bin la 1ra olla para mezclar.
Para la segunda capa, coloque el paño sobre el casco teniendo cuidado con las marcas de alineación y cepille como antes usando solo suficiente epoxi para mojar el paño.
Repita para la tercera capa recordando limpiar las herramientas en el medio. Utilizo cuatro inmersiones de epoxi para la última capa porque quería que la capa exterior estuviera un poco más húmeda. Cualquier exceso sería absorbido por la capa protectora.
Finalmente envuelva en una capa de piel. Usé 10 metros de 100 mm de ancho. Exagerado, lo sé, pero hizo un trabajo increíble a pesar de que el casco se parece un poco a una momia. (Imagen 5)
Al mismo tiempo hice los componentes de la Imagen 8. 9. 10. 14, 15 y 18. La caja de aletas fue obra de Dave Creed.
Esta mañana despegué la capa de cáscara y descubrí un casco sin burbujas de aire, con una adherencia perfecta en la proa, la popa y la cubierta de proa.
En todo el proceso duró unas 3 horas.
Todo lo que necesito ahora son dos capas de imprimación epoxi frotando suavemente y estoy listo para quitar el casco del tapón. (Imagen 6 y 7)
Si todo se ve bien y sé que el casco es utilizable, puedo pagar la tarifa de diseño y acondicionar el barco.
Después de haber agregado dos capas de imprimación epoxi, es hora de frotar todo de nuevo en la superficie del vidrio S para que el casco sea lo más liviano y suave posible. Hasta dos horas de lijado. ¡Alegría! pero el resultado final vale la pena el esfuerzo.
Después de pintar sobre 250 g de imprimación epoxi de alto espesor, lijé 200 g el sábado. El resultado es un casco liso muy ligero por el que se puede ver.
El casco permanecerá en esta condición hasta que la cubierta esté terminada y todos los agujeros perforados. Entonces es el momento de la envoltura de vinilo en azul metálico. No puedo esperar a ver cómo termina cuando se corta el molde.
Una vez que el casco está fuera del molde, pasa directamente a una plantilla de soporte, con los marcos cortados del plan de diseño. Esta plantilla está marcada y se utiliza para establecer la posición de la aleta y el timón. (Imagen 7)
La cubierta de proa y la cubierta de popa se unen con 1 capa de tela de 124 g (Imagen 13). El casco es fuerte y está listo para que se adhieran la caja de aletas, el mamparo y la cubierta contigua y la olla de radio.
El domingo corté todos los orificios de acceso (Imagen 33) y agregué dos capas más de vidrio S alrededor del área de la caja de la aleta en el casco, pegué la cubierta con una capa adicional de vidrio S en el punto de despegue del foque y coloqué el espejo de popa
Puse pequeñas placas de refuerzo en la cubierta en la popa y puse 1 capa de vidrio S de aproximadamente 1 pulgada de ancho en el centro de la cubierta de proa.
Todo el peso del casco con toda la infraestructura de vidrio, pero la instalación, será de alrededor de 400 g, considerablemente más liviano que mi primer casco, especialmente en los extremos, pero más pesado que los cascos profesionales. Dicho esto, el casco es muy fuerte, ligero en los extremos y debería ser competitivo.
El trabajo de hoy es colocar la aleta, el mamparo, la moldura de la plataforma y el radio y un poste para el punto de despegue de la tachuela del foque. En curso para terminar el casco a finales de semana.
Un largo día sellando proa y popa, (Imagen 18 y 19) reforzando la cubierta de proa, construyendo un poste de proa ultraligero (Imagen 14), cortando una ranura en el casco (Imagen 21), midiendo y dando forma al mamparo de proa (Imagen 15). y 16) , estuche de aleta y cubierta. Muchas imágenes a continuación en un orden ligeramente aleatorio.
Mañana espero unir todas las piezas y luego los únicos otros trabajos importantes son colocar las placas para el servo y la culata del timón, lo que probablemente se realizará el miércoles. Luego, frote y perfore todos los orificios para los accesorios de la plataforma. Finalmente, después de eso, puedo envolver el barco en su vinilo azul metálico. Es un experimento pero estoy seguro de que valdrá la pena el esfuerzo y si no funciona siempre puedo pintarlo.
Colocando la aleta
Ayer se trató de instalar la caja de las aletas. La alineación de la aleta exactamente en la posición correcta con las medidas de diseño y tenerla vertical es el trabajo más crítico en el barco. Si lo hace mal, será difícil mantener el equilibrio del barco y es posible que navegue más alto en una virada que en la otra.
El barco en mi plantilla está configurado para estar nivelado en su línea de flotación, es decir, hay una conexión de línea horizontal entre la parte inferior de la proa y la parte inferior de la popa. El borde de ataque de la aleta se encuentra perpendicular a esta línea. Haz la plantilla correcta y todo es fácil. En el plano hay dos medidas, una desde el casco hasta el borde de ataque de la aleta y luego otra desde la punta de la proa hasta la parte inferior de la aleta por donde entra en el bulbo. Establezca estas medidas y el borde de ataque de la aleta debe estar perpendicular a la línea de flotación del barco. Estaba a menos de un título. Ver imagen 24-27.
Para que la aleta se vea exactamente vertical desde la popa, nivelo el bote en el punto de la cubierta y uso un nivel en la aleta para hacerla vertical y luego uso cinta de enmascarar para asegurarla. La gravedad ayuda en la imagen 27.
La cuerda de la imagen se usa para medir desde el arco hasta la aleta, pero tuve que hacer agujeros en la plantilla.
Mañana, puedo colocar las piezas finales de la cubierta y el mamparo.
Terminando la unión
Ayer fue día de pegado. Se instaló la cubierta de proa, el mamparo preperforado, el soporte de la olla de radio y el poste de la escotilla principal.
Solo un pequeño error. Olvidé sellar y reforzar la parte superior de la caja de la aleta.
Tengo el trabajo más complicado para hacer eso hoy, además del ajuste final para el soporte del servo y el soporte del timón. Los trabajos de nido consisten en perforar previamente todos los orificios de los accesorios, aplicar masilla donde sea necesario y lijar final listo para aplicar la envoltura.
Al colocar el poste de la hoja principal, medí con precisión una línea central en la plataforma y luego hice lo mismo con una cuerda a 6 pulgadas de la plataforma. Luego, usando una escuadra, pude colocar el poste de la hoja principal en posición vertical y alineado con la caja de la aleta, el soporte trasero, los ojos de la hoja del foque y los puntos de sujeción del foque que están todos marcados. Los dedos cruzados sobre las velas fijarán lo mismo en ambas bordadas.
El peso del casco hasta ahora es de 420 g. Peso del casco antiguo en este punto 620gms. Tal vez se puedan lograr 350 g con una bandeja un poco más delgada. Fui generoso con el epoxi en la base de la aleta, pero aquí es donde estarán los correctores de todos modos. Se necesitarán aproximadamente 400 g de correctores.
Poner en orden
El último refuerzo fue ayer. No hay mucho que mostrar, ya que el barco se ve similar al del día anterior, pero con la adición de una culata de timón y soportes de servo. Dando al casco un buen corte en t para buscar puntos ásperos y luego la envoltura azul metálico
Pequeños trabajos restantes por hacer después de la envoltura como el ajuste final de la aleta y agregar la electrónica y los accesorios.
Terminó la construcción
Con los trabajos finales eliminados el viernes, el casco está listo para envolver. Pasé hoy lijando y limpiando el casco y la cubierta, ajuste final de la aleta y el timón que terminaron exactamente de acuerdo con los planos de diseño y ambos están alineados entre sí. Mañana será el día final.
Pedí las nuevas plataformas PG de Potters Solutions y un par de brocas y bobs de Sailsetc. Una vez que el barco está envuelto, puedo instalar los nuevos aparejos utilizando accesorios existentes además de los obenques. Luego, un poco de puesta a punto en casa y estoy listo para entrar en el agua.
No es una envoltura
La envoltura falló. Hay tanta curvatura en el casco y la cubierta, es necesario estirar tanto la envoltura antes de la aplicación y se necesitan varios pares de manos, por lo que se vuelve a rociar la pintura.
El barco está terminado salvo el aerosol y, como dijo el Sr. Gibson, está mucho mejor con la pintura, ya que el vinilo dañado es imposible de reparar. Debería saber que solía envolver 18 pies de página, entre otras cosas. ¿Por qué no hablé con él primero?
El sueño estaba ahí, faltaba la experiencia. Me encantó el acabado metálico pero no será así.
Hacia adelante y hacia arriba y hacia fuera para ver la carrera de 18 pies alrededor del puerto de Sydney en el JJ Giltinan. En la computadora, por supuesto
Tiempo de decisión sobre la pintura
Ha sido un largo proceso tratar de clasificar la pintura para el barco. Podría usar mi paquete de 2 unidades de poliuretano probado y comprobado, que sé que es duradero y la solución correcta, pero quiero rociar para mantener las cubiertas con un aspecto elegante. Como saben, intenté usar envoltura de vinilo pero las curvas del bote resultaron ser demasiado.
La búsqueda me llevó a rociar latas de epoxi, esmalte y otros acabados, pero encontré una pintura de base acrílica industrial en una lata de aerosol. Está diseñado para la reparación de revestimientos industriales de interior o exterior. Es un riesgo, lo sé, pero preparé una muestra esta tarde y tiene un gran color, es dura, flexible, tiene excelentes propiedades UV y es resistente a los arañazos. La hoja de fecha está aquí:
http://www.farnell.com/datasheets/3165638.pdf
Así que continúa mañana y veremos cómo funciona la pintura. Las imágenes a continuación muestran el nuevo aspecto del aerosol en una muestra y el efecto que estoy tratando de evitar al pintar 2 paquetes de poliuretano. Te mostraré el resultado mañana y luego veré cómo se ve cuando nos pongamos a navegar.
Problemas con la batería
El equipamiento del casco se completa con la quilla y el timón en perfecta alineación. Cuando fui a probar los componentes electrónicos, comencé a cargar la batería e inmediatamente noté que se estaba hinchando. Saqué la batería afuera ya que hay historias interesantes sobre baterías que explotan. Dos más en orden. El progreso se detiene hasta que lleguen nuevos mástiles PG y baterías la próxima semana.
Tenga cuidado, vigile su batería Lipo / Lifo si no las ha cargado durante un tiempo. Si muestran signos de expansión, sáquelos de la casa.
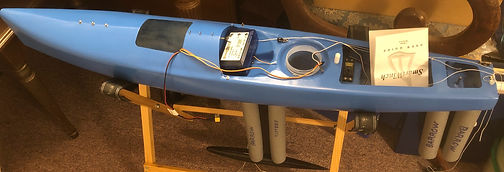
Dentro de la olla de radio
Leí un artículo de Darren Paulic publicado en Facebook RC Sailing Group y se puede encontrar aquí. Navegación por radiocontrol en agua salada.
En el artículo, Darren habló sobre la importancia de mantener los sistemas eléctricos fuera del agua y cubrirlos con vaselina o grasa de silicona . Puso una capa de neopreno en la base de su batería y receptor para mantenerlos fuera del fondo de la olla de radio para protegerlos de cualquier entrada de agua. Pensé un paso más en una solución simple y ordenada y descubrí que puede usar velcro adhesivo en la parte posterior que se adhiere como ya sabe, incluso a Correx, para mantener la batería y los componentes del servo separados y fuera del fondo de la olla. También puede colocar una pequeña pieza en el extremo de los cables del receptor para mantenerlos a 90 grados entre sí para un rendimiento óptimo de la señal de radio. Recuerde colocar la batería en la línea central del barco. Imagen 38 y 39.
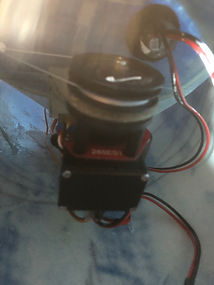
Problemas con el cabrestante o fue un error del operador (Imagen 40)
En primer lugar, un gran agradecimiento a Bill Green (RMG Reino Unido), que ofrece un excelente servicio y es tan rápido en responder a las consultas. Cuando desmonté y volví a ensamblar mi equipo de radio para transferirlo al nuevo barco, no pude entender por qué cuando encendí mi transmisor en el cabrestante movido una vuelta. Apague el transmisor y regresó a su posición original. Una llamada a Bill debería resolver el problema. Él dijo con razón que debería programar los límites del cabrestante según el manual que no había dominado anteriormente y ver qué pasa. Hice eso pero no solucionó el problema.
Duh, eventualmente lo recordé. En un zoom de entrenamiento de Emsworth, su hombre, Richard Ballas, que es un genio de la radio, habló sobre la configuración del modo a prueba de fallas en el transmisor. Esto le permite colocar el timón y la escota en el barco para que gire en círculos en lugar de navegar hacia la distancia si el barco pierde la señal de radio. Lo había configurado hace unas semanas, pero había olvidado lo que haría. Cada vez que apagaba el transmisor, la hoja se aflojaba una vuelta y media y el timón giraba 25 grados. Encienda el transmisor y la escota y el timón vuelven a su posición original. Problema resuelto, ahora todo lo que tengo que hacer es ajustar la configuración del cabrestante cuando esté completamente montado.
Pesos actuales hasta ahora:
Casco desnudo pintado 460gms
Accesorios y RC 373gms
Timón 32gms
Bulbo y aleta 2500gms
Aparejo estimado 235 a 300gms
Por lo tanto, calcule de 365 a 400 g de correctores.
Aquí está el barco en todo su esplendor.